Category Archives: Fish Recipes

Will Segar Line Help You Catch Panfish That Are Delish: Catch & Cook

Panfish Delish: Catch & Cook

One of the most accessible groups of fish across the country are the various panfish species. They can be found just about everywhere and are generally prolific and tons of fun for all ages to target. Bluegill, crappie, perch, and other similar species are also some of freshwater’s best-tasting fish.

Two popular fishing guides, Western New York’s Capt. Joe Fonzi and Wisconsin’s Jeff Evans each spend a good portion of their seasons guiding for panfish, which end up making an excellent meal for their clients. Both shared insight into their favorite species, how to catch them, and their secrets for cooking the best-tasting fish.

It’s Crappie for Evans

Evans began with a borderline sacrilegious statement about his preferred fish to eat in a walleye-crazed state like Wisconsin. His choice is the crappie.

“I’ve told people I would trade a walleye for a crappie every day, especially fresh crappie; it’s hard to beat,” he said. “I love eating crappie, and they are so much fun to catch. After they spawn and transition to the deeper weed edges and weedy points, they will usually be in those places until they head to the basins in the fall.”

Targeting weed lines, Evans said it’s hard to beat a small 1.5-inch tube jig on a slip bobber. “It’s tried and true, we probably catch 90 percent of our crappies that way,” he said. “We try all sorts of colors but always seem to come back to pink and white. This rig is something we use all season long; it’s a super versatile way to fish because you can easily adjust your bobber for the depth.”

Evans also likes the rig for its ease of use in all weather conditions. “It’s great because if you have a breezy day, the waves will give the bait for the action you need, and then when it’s calm, you can pull the rod and get the action,” he said. “It keeps the bait right in front of the fish.”

Fishing lightweight 1/32 and 1/64-ounce heads can be tricky to keep the bait down, so Evans has learned to add a 1/8-ounce egg sinker a foot above the bait and connect his mainline and leader to a barrel swivel. 

“That’s a great way to keep your bait below the surface, but it also helps with casting so you don’t tangle the slip bobber as much,” he said. “I like to use a 1/8-ounce Thill Wobble bobber and adjust the slip to the weight. For my mainline, I like 15 lb Seaguar Smackdown in the Flash Green color. It casts incredibly far and is good at holding the slip knot in place.”

Evans utilizes a 12-inch section of Seaguar Gold Label fluorocarbon leader material between the barrel swivel and tube jig. “6 lb is perfect for crappie because it’s such a thin diameter and gives you a nice natural finesse presentation for your jig,” he said.

Early and Late Season Perch

Primarily fishing Lake Erie out of Buffalo, New York, Capt. Fonzi is a well-accomplished smallmouth bass angler and a premier trophy bass guide, but perch are also a big part of his guiding business. 

“Perch are the main target for me in April and then again in September and October,” said Fonzi. “Both times of year are in the same areas and deep; in the spring, our fish will spawn as deep as 50 feet of water, which most people don’t realize,” he said. “They come into those areas again in the fall and will stay there all winter until we pick back up the next spring.”

These areas that he’s looking for are breaks and depth changes. “In most lakes, perch spawn on the edge of weeds, but we don’t have that in Erie, and instead, they use the rocks and vertical structure of the depth changes,” he said. “They’ll use these same areas in the fall to feed up on baby gobies. Those elevation changes hold tons of baitfish, and the perch gorge on them and eat like pigs.”

Targeting depths around the 50-foot range, Fonzi’s most productive setup is a double drop-shot rig with either live shiners or small soft plastic baits.  

“What works well is a 4-inch Yamamoto Senko cut in half; they eat the heck out of those in the white colors or chartreuse with gold flake,” he said. “I like to use as light of a drop-shot weight as possible and will start with a 5/8-ounce weight but will adjust if I need to based on the wind and waves. I’ll also adjust my leader length on the hooks based on how the fish act; some days, the first hook could be only a few inches above the weight, and other times, it could be higher if the fish are suspended chasing baitfish.”

His line setup is a 10 lb Seaguar Smackdown braid and a leader of 10 lb Gold Label fluorocarbon. “We may get a few more bites with a lighter 6 or 8 lb leader, but fishing this way, you run into a lot of big walleye and bass as well, which gives me some added strength to land those as well,” he said. “The other thing you run into is constantly swinging two jumbo perch at the same into the boat over and over, which can stress your line, so the heavier leader helps and won’t break.”

Cooking Your Catch

When targeting crappie, Evans is cautious and limits how many he and his clients bring home each trip to protect the fishery. He’s a fan of a good old-fashioned fish fry and has narrowed it down to how many filets it typically takes to feed each person in attendance.

“It’s hard to beat fried crappie, and it always seems to work about four filets per person since some won’t eat that many, and others will eat more,” he said. “Having a fish fry at the end of the day is a great way to celebrate your day on the water, but I also don’t take too many because our lakes can be susceptible to overharvesting, especially with all of our new technology for electronics. I never take more than ten fish home, even though the limits are much higher.”

Every lake is a little different in size, but Evans says generally, crappie between 8 and 11 inches are perfect for a fish fry, and he’ll release the bigger ones. One trick he learned to get great-tasting fish is to utilize hot sauce.

“If you dip the filets in Frank’s Red Hot and then coat them in whatever crumbs you prefer to use right before going into the hot oil, they taste incredible,” he said. “It’s not too spicy after they are cooked, but the flavor is incredible.”

Fonzi prepares his perch in many ways, but one of his most often requested meals is fried perch sandwiches. “I like to mix either House Autry, Shore Lunch, or Uncle Buck’s fish fry seasoning half and half with Italian-style breadcrumbs,” he said. “Then I’ll enhance the mix with some Romano cheese, extra Italian seasoning, or garlic powder. Then, I’ll dip the filets in egg and place them into that mixture. It helps fill the voids in the filets, and they turn out crispy and crunchy when you fry them.”

He finishes the sandwich with a slice of American cheese and homemade tartar sauce made of Miracle Whip, relish, and lemon pepper as the dressing on top. 

Catching panfish is always a good time as you can often get into large numbers and catch them quickly. The reward for catching them is an excellent meal at the end of the day, and their great-tasting filets keep anglers returning for more.

Seaguar Smackdown braid is available in high visibility Flash Green and low visibility Stealth Gray. It is available in 150- and 300-yard spools in sizes ranging from 10 to 65 lb tests.

Seaguar Gold Label Fluorocarbon leader is available in 25- and 50-yard spools in 2, 4, 6, 8, 10 & 12 lb tests for freshwater use, complementing the 15, 20, 25, 30, 40, 50, 60, and 80 lb test leaders available for saltwater.

Cooking Catfish Stew and Other Fish Recipes

Mama was a great cook as were all my extended family, both blood relatives and in-laws.  I often said Aunt Nancy could cook and old boot and make it taste good. Her husband, Uncle Adron, hunted and fished constantly and she cooked great meals of game and fish.

    One of my favorites was her catfish stew. It really was more like hash, everything was ground up.  Mama would get with her anytime I caught a big catfish and cook up a big pot. I enjoyed many winter meals of it and saltine crackers sitting on my porch at my small trailer at Clarks Hill.

    I tried making it last week with a  big cat I caught in the Sportsman Club tournament at Sinclair.  A few years before she died I asked mama to write some of her recipes down and I have dozens of index cards with her hand written ingredients and instructions.   

Unfortunately, mama’s Alzheimer’s was starting to affect her memory and many of her recipes I have to guess at some steps.  For example, her catfish stew recipe calls for ten strips of fatback but it is never mentioned again in the instructions.

The ten quarts I made are pretty good but not quite right.  I will keep trying.

I love any kind of fish stew or chowder. When I eat out the first thing I check on the menu is the soups and stews.  Fishtales in both Griffin and Zebulon make a good gumbo and a good shrimp chowder.

I make two kinds of fish chowder, one with a red tomato sauce Manhattan style and one with a milk and cream base New England style.  The Manhattan style has a very strong fishy taste and smell, to the point no one would come in my office when I was principal at RESA Academy and took it for lunch.

Both start with bass filets but the Manhattan style I boil what I call backs and wings – the backbones and rib cages left after fileting – and use the strong broth from that process. I pull all the meat off the backbones and “wings” and add the filets to the broth then add other ingredients.

The New England style I just boil diced potatoes, pour off the water and add milk and other ingredients, adding the filets last thing.

I have cooked pretty much everything I have shot my whole life.  BBQed raccoon was  one of the oddest, but Southern Mississippi Beaver was definitely the most unusual, and also the most difficult.  I spent a long time skinning out the hindquarters of the beaver, it was by far the most difficult animal I have ever skinned and gave up on the front legs and shoulders. They were very small anyway.

I have many detailed recipes for game and fish that I make in the Fish Recipes category.

Cooking Bluegill with Mark Zona

COOK YOUR CATCH: BLUEGILL WITH MARK ZONA

from The Fishing Wire

Cook Your Catch: Bluegill with Mark Zona

Who doesn’t love a good fish fry? And when the fish getting dropped in the fryer is bluegill, well, to say you’re in for a treat is an understatement. What bluegill lack in size, they more than make up for in flavor. The firm, white meat has a mild, delicious flavor that flakes up nicely when fried.

For this recipe from Mercury Dockline, Mercury Pro Team member Mark Zona, co-host of “Bassmaster” and host of “Zona’s Awesome Fishing Show,” shows how he fries up this delectable little fish. It’s a simple recipe that’s easy to commit to memory, and will make you a favorite among family and friends.

Ingredients:

  • 5 pounds bluegill fillets
  • 1 box Fryin’ Magic® Seasoned Coating Mix (16 ounces)
  • Cajun seasoning
  • 1 quart of vegetable or canola oil
  • 1 stick butter-flavored Crisco® shortening
  • ½ cup grated Parmesan cheese

Preparation:

Start by soaking your bluegill fillets in milk for a couple hours. According to Zona, this step will enhance the flavor. And seeing how you have a bit of time on your hands before the fish is ready to be coated and fried, you might think about what you’d like to serve with your bluegill. You can go with a store-bought coleslaw or perhaps you make a nice green salad. In this case, use the time to slice up some vegetables to accompany the greens. Peppers, carrots, radishes, tomatoes and any other veggies you like will work perfectly. Of course, if you prefer, you can always go with some good old-fashioned French fries!

Once you’ve allowed the time for your fillets to soak, add one package of Fryin’ Magic and some Cajun seasoning to the bottom of a batter shaker. Next, add the fish to the top, put the lid on, tip the container upside down and shake gently to thoroughly coat each piece of fish. Now Zona doesn’t specify just how much of the Cajun seasoning mix to add, but that’s probably because when it comes to spice, everyone’s tastes are a bit different. 1-2 teaspoons should do the trick.

If you don’t have a batter shaker, you can just as easily coat your fish in another container with a lid. Whichever method you use, just be sure to coat each piece of fish evenly.

Once you have all of your bluegill coated, it’s time to get frying. In this video, Zona is using a deep fryer, but if you don’t have a deep fryer, a deep frying pan will work just as well. Whichever vessel you use, heat the oil to 375 degrees. Once the oil has reached the target temperature, add one stick of butter-flavored Crisco, if you like. It gives the fish an even richer, complex flavor.

Little trick when frying your fish – do not overcrowd the fryer or frying pan. Doing so will bring the temperature of the oil down, and when that happens, the fish will absorb an excess amount of oil and become soggy.

Fry the fillets for approximately 3-4 minutes. When the fillets begin to float and are a nice golden-brown color, you know you’re just about done. At this point, Zona recommends cooking for another 20-25 seconds. Next, scoop out the fish, drain any excess oil and transfer the fish on top of a couple layers of clean, dry paper towels.

Before you plate your bluegill, sprinkle a little grated Parmesan cheese on top. The richness of the cheese works nicely to balance out the spiciness of the Cajun seasoning. Serve alongside your side dish of choice, and, voila, dinner is served … Zona style! Enjoy.

To learn more about Mark Zona or “Zona’s Awesome Fishing Show,” visit MarkZona.com. You can also follow him on InstagramFacebookTwitter and YouTube.

Fryin’ Magic is a registered trademark of Little Crow Milling Company, Inc. Crisco is a registered trademark of Procter & Gamble Company. All other trademarks belong to Brunswick Corporation.

How To Cook Panko Crusted Perch Or Any White Meat Fish Like Bass Or Crappie


PANKO-CRUSTED PERCH

0

Panko-Crusted Perch

Prep Time: 30 minutes

Cooking Time: 30 minutes

Ingredients:

  • 1 pound of boneless perch fillets
  • 2 to 3 large eggs
  • ⅓ cup of all-purpose flour
  • 1½ cup of Panko breadcrumbs
  • 1 teaspoon of kosher salt, plus extra
  • Freshly cracked pepper, to taste
  • 1 cup of mayonnaise
  • 4 teaspoons of Sriracha sauce
  • 4 teaspoons of lemon juice
  • Vegetable oil for frying
  • Lemon wedges, for serving
  1. To make the spicy mayo, combine mayonnaise, Sriracha, lemon juice, and salt and pepper to taste. Add or subtract amount of Sriracha to taste. Set aside.
  2.  Assemble your dredging station: In a wide bowl, beat eggs until no whites are visible and mixture begins to form small bubbles at the edges. Pour Panko breadcrumbs into a shallow bowl/dish and season with 1 teaspoon of salt and pepper to taste. Then pour flour into another. Heat frying oil to 325 to 350 degrees Fahrenheit.
  3.  First lightly coat a perch fillet with flour, shaking off excess, and then dip it into the egg mixture and then finally coat with Panko. Fry on both sides until golden and drain on paper towels or a cooling rack. Repeat with the rest of the fish, adjusting heat as necessary. As you work, keep fried fish warm in the oven on the “warm” setting.
  4. Do not overcrowd the fry pan — oil temperature will drop too quickly, which will result in greasy fried fish. Also, do not allow the oil to get too hot, as Panko breadcrumbs can burn quickly. Continually keep an eye on the oil temperature with a thermometer and adjust the heat as you cook. If you’re not used to working with Panko, it helps to have an extra set of hands in the kitchen.
  5.  Serve fried fish with spicy mayo for dipping and lemon wedges on the side. For a light meal, serve the fish in butter lettuce cups with sliced cucumber, pickled carrot and a dollop of spicy mayo on top.

– Recipe and photo by Jenny Nguyen-Wheatley, NEBRASKAland Associate Editor

Cooking Fish and Game

COOK YOUR CATCH: YELLOW PERCH TACOS

Cook Your Catch: Yellow Perch Tacos

Cooking your catch is ok as is catch and release. Nothing wrong with some catch and hot grease!

If you’re a fan of the Friday night fish fry, it’s very likely you’re familiar with yellow perch. This freshwater favorite might just be the ultimate fish for frying. That’s because its small fillets are tender and delicate, with a mild, sweet and delicious flavor profile.

For this installment of Cook Your Catch, Taylor Wright, of “The Canadian Tradition” television series, shows how to make yellow perch tacos. A dish that is at once simple and exquisite.

Ingredients:

  • Two whole lake perch (or four prepared fillets)
  • 2 eggs
  • 2 tablespoons cream
  • 1/2 cup breadcrumbs
  • 1/2 cup panko breadcrumbs
  • 1 cup all-purpose flour
  • 2 cups vegetable oil
  • 1 cup shredded lettuce

Preparing the Fillets:

For this recipe, you can either purchase fresh, pre-cut yellow perch fillets or you can head out on the water yourself and catch your dinner.

In the video below, Wright shows his process for filleting perch. You can also check out this Dockline blog on How to Fillet Fish with a Fixed-Blade Knife. The same steps work for yellow perch.

Once you have all your fillets, be sure to rinse them in cold water.

Next, combine the breadcrumbs with the panko in a bowl and set aside. Crack a fresh egg in a second bowl, add the cream and whisk together to combine. Then place the flour in a third bowl.

It’s now time to dress the fillets and get them ready to fry. Dip each fillet, one at a time, into the flour, covering both sides of the fish. Then, do the same with the egg wash, making sure to coat the fillet thoroughly. Finally, transfer the fillet into the bowl with the breadcrumbs and cover thoroughly. Do this for all your fish, and then set aside on a clean plate.

Before you make the simple sauce, pour two cups of vegetable oil into a pan on your stovetop, and set the burner to medium heat.

Making the Sauce:

In a small bowl, combine a cup of mayonnaise with some of your favorite hot sauce. Be mindful of the fact that not everyone has the same tolerance for heat. Extra hot sauce can be placed on the table for anyone wishing to dial up the spice level.

Frying the Fish and Serving Dinner:

With your sauce prepared, check to see if your oil is hot enough to fry your fish. The easiest way to do this is to use a kitchen thermometer. The ideal temperature for frying fish is between 350 and 365 degrees. If you don’t have a kitchen thermometer, place a wooden spoon into the oil. If you see bubbles forming around the spoon that float to the surface, then your oil has reached the appropriate temperature for frying.

Fry each of the fillets for a couple of minutes on each side. They should be golden brown in color. Carefully lay each of your perch fillets into the pan to prevent the hot oil from splashing. After you’ve cooked all the fillets thoroughly on both sides, lay them on some paper towels to remove any excess oil.

Then, place roughly one to one and a half fillets on top of the tortilla. You can use either corn or flour tortillas or a combination of both. Spoon some sauce on top of each tortilla and add a little chopped lettuce for color and crunch. Fold it up and dig in!  Just be careful – fish right out of the frying pan can be pretty darn hot.

And there you have it – yellow perch tacos. Simple. Easy. Delicious. Enjoy!

Video showing how to do it!

Tips On Cleaning and Cooking Trout

Trout, From Lake to Table
Tips on cleaning and cooking trout from Nebraska Game and Parks

By Larry Pape
Nebraska Game and Parks Commission
from The Fishing Wire

Keep your catch of fish as fresh as possible and you will be rewarded with a wonderful meal that is the finale to a fishing trip. In mid-October, trout will be stocked across Nebraska in small city park ponds and state park lakes.

These pan-sized fish offer a person the delicious main course of a meal. From the lake to the table, every step is critical in making the best of what nature has given you.

Fish are a perishable food product and the quality of the meal is only as good as the handling of the fish after the catch. If practical, fish can be kept alive until just before cleaning. The best method is to keep them as cold as possible, as soon as possible. If you know you are going to be keeping fish, take along a cooler with ice and place them in it immediately after catching.

A 10-inch rainbow trout is one of the easiest fish to prepare for the pan. It is not necessary, nor advisable to skin or filet a small trout, as they have delicate flesh that is best kept whole. The method is simply to remove the internal organs and gills, and then wash.

Do this by making an incision along the belly from the vent to the gills, and disposing of the entrails. The gills may take a little more cutting to release them from the head. The head can be left on or removed depending on the diner’s sensibility. Notice a dark area inside and along the spine of the fish. This is the fish’s kidney and can be removed by gently rubbing while washing. It does not change the cooked product if left in the fish.

There are two easy methods for cooking trout:

Pan fry – Dredge in a mixture of flour, salt, pepper and seasoning of choice. Fry about 3 to 5 minutes per side in a quarter inch of medium hot oil. Use spatula to turn the fish gently. When done, place on a platter to rest for a few minutes before serving.

Bake – Wrap in foil and cook on the grill or in the oven. This allows each fish to be seasoned to the particular desires of the diner. Oil is necessary to keep the fish moist; use butter, olive or vegetable oil; just a splash will do. Spices can be delicate such as rosemary and parsley, or bold such as Cajun and curry, but remember that a little goes a long way. To add flavor and edible ingredients, include sliced onions, garlic cloves, capers, or artichoke hearts.

Seal this foil packet and bake on the grill grates or in the oven on a baking sheet for 10 to 15 minutes (350 degrees). Serve after resting for a few minutes and then placing each packet in front of the diner on a plate. Open carefully to release the steam and aroma.

A trout meal is best served with rice, vegetables and the stories of how they were caught.

If you are just getting into fishing and want more details, a helpful resource is Game and Parks’ Going Fishing Guide, available at OutdoorNEbraska.gov/howtofish. For information on Fish Stocking, including the dates pf upcoming trout stocking, OutdoorNebraska.gov/fishstockingreports.

Keep Your Fish Fresh!!

From Alabama Gulf Seafood

from The Fishing Wire

Note – i always keep my fish on ice overnight before fileting them!
Ronnie

Ask anyone about their top priority when it comes to seafood and you’re likely to get the same answer: Freshness matters most.

But what about your own kitchen? When it comes to seafood caught or bought at markets and stored in your fridge or freezer, how can you make sure you’re cooking and eating it while it’s still fresh?

These are important questions to ask. After all, the freshness of your seafood isn’t just a health and safety precaution—freshness affects the flavor of your product as well as the nutritional value you’ll get from it.

Here are a few ways you can make sure you’re buying, storing, and cooking only fresh seafood in your own home.

Use Your Senses When Buying Product
It might be tough to eyeball a fish and know when it was caught if you didn’t land it yourself, but there are a number of ways you can check the available product at your local market to make sure it’s fresh.

For whole fish, make sure the eyes are clear and bulging, and look for bright red gills and shiny flesh. Make sure individual filets aren’t dark or dry around the edges, and watch out for green or yellow discoloration. Make sure the product is not dry or mushy. Avoid any product that smells fishy and not mild. Check the packaging to make sure it’s not torn open or above the frost line. And for peak freshness, make sure the product is being kept on a thick bed of unmelted ice.

As for blue crabs and oysters, make sure you’re buying this product live! Both of these species will spoil very quickly, so make sure the crabs are still moving and the oyster shells are still closed.

Ask Your Seafood Dealer About the Product
Many seafood dealers will identify their product by country, or state if it’s domestic. But if the product is unlabeled, you know what to do: Always ask, never settle.

Some seafood markets even work with traceability programs that can pinpoint when and where the product was caught, but don’t get too hung up on those details. Location matters, of course, but how the fish was caught and handled has more of an effect on the freshness than how long it’s been out of the water. In fact, fresh-caught fish need 12-24 hours before they can be cooked and eaten because of stiff muscles due to rigor mortis. Additionally, some smaller fishing boats will be gone for a few days at a time, and they may flash-freeze their catches (which isn’t actually a bad thing in terms of freshness).

Properly Refrigerate and Freeze Your Product
Once you’ve determined that you’re buying fresh product at your local market, it’s up to you to properly store it at home until it’s time to cook and eat.If you’ve picked up Gulf fish and shrimp, you’ve got about a 48-hour window to keep them in your refrigerator before they start to lose freshness. At that point, you’ll need to store them properly and keep them in the freezer until you’re almost ready to cook. (For tips on storing and stocking Alabama Gulf Seafood, check out our six tips for freezing your product.)

Remember, your filets and your shrimp will need time to dethaw before you can cook ‘em. Thaw your product overnight in the fridge, or if you’re short on time, run your product in cold water. (Don’t leave your product out to thaw at room temperature.)

Properly Store Your Deep Sea Catches
If you’re catching your own seafood to cook and eat, we salute you. We would also recommend properly storing those catches so you can keep them fresh.

As soon as you reel in a species worth eating, make sure you immediately transfer it to a cooler packed with ice. And if you’re able to, store that cooler in the shade to keep the ice from melting, and drain the melted ice periodically so the texture of the fish isn’t affected. You’ll want to fillet and clean your catches sooner rather than later as well; in fact, if you’ve got a vacuum sealer, bring it with you and clean and pack them at the docks, then ice them down for the trip home. (For tips on proper maintenance, check out our tips for freezing your deep-sea catches.)

And remember, if you catch a fish in the morning, make sure you give it at least 12 hours before you cook it so the muscles can relax. It’ll be just as fresh tomorrow if you store it properly!

Cooking Game and Fish

Following the Recipe!

     I love to cook, especially things I have caught, killed or grown. Mama was a fantastic cook, making big meals every day on the farm for daddy, my brother and me and three or four farm workers.  She taught me to cook like her, country farm cooking, and used to laughingly say I needed to learn to cook since I would never find a woman to cook for me.   

She was wrong in that, Linda is a great cook, but she really does not like to, so I do most of the cooking at home.  We set that routine when, in our first year of marriage, Linda taught school while I finished my last year at UGA.  She got home late and I was home early every day, much less tired than her, so I did the cooking.   

I have cooked most anything I could catch or kill over the years.  While in college I shot a raccoon and cooked it for dinner.  I thought BBQed coon was good but Linda not so much.  The same for a beaver I cooked a few years ago. I will never do that again, not because it did not taste good to me, but because it was the most difficult animal I have ever tried to skin.   

Gar taste good but are hard to clean, you start with tin snips.  Carp and shiners are ok if you like a mouth full of bones in every bite. I have at least ten ways to cook bass filets, from fried to nuked with picante sauce to baked with wine and cheese sauce, and like them all.   

I cook a lot of venison.  Each day I get recipes in email from Taste of Home magazine and try many of them.  Some are great and I cook them often, others are ok but either a lot of trouble or not a favorite. They are usually one hit wonders.   

In the past few weeks I have cooked Bobotie, a South African dish that has ground meat.  It falls into the second category in two ways, it is difficult to cook and has a flavor that is just ok. It is the sweet spices in it, tamarind and raisins, that remind me of the pigeon pie with cinnamon and raisins I had in Marrakech, Morocco.  Sweet meat is not that good to me.  

  Others in the first category include cabbage roll casserole, a simple way to make cabbage rolls if you do not like rolling the leaves.  It is a one dish meal, just add a little cornbread.  That is a great meal when camping – just heat a bowl of leftovers in the microwave.   

Asian noodle casserole is very simple, with ground meat, ramen noodles and a bag of broccoli stir fry veggies.  Another one dish meal.  Roast in the crockpot with ranch and au jus dressing is delicious and very simple.    

I use the crock pot a lot for everything from venison steak with peppers and onions or mushroom soup to venison stew meat with BBQ sauce.  It is a simple way to cook and keeps venison moist.

On fishing trips, most guys stay in motels and eat in restaurants, but I much prefer camping and grilling.  Venison is too dry to grill, so I always do chicken, steak and pork chops on the grill, and am usually done eating before the guys in the restaurant can get their order.

I never order steak when I do go out – I have not found one that taste as good as what I grill. I try to find fried scallops, my favorite, and I have never been able to cook them just right at home.

I’m hungry, I am going to cook something.

Salmon, Steelhead and Trout Smoking Tips

Salmon/Steelhead/Trout Smoking Tips from Yakima Baits
By Yakima Baits Pro Buzz Ramsey
from The Fishing Wire

Smoking fish tips


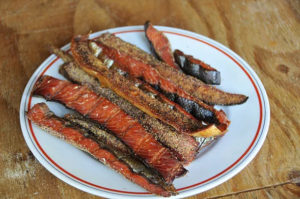
For over 20 years, I spent a month or more at a time chasing winter steelhead on the Oregon Coast, taking outdoor writers, fishing tackle buyers and industry VIP’s fishing. Since I worked for a fishing tackle company that made smokers designed for fish and game, I went out of my way to have fresh smoked fish available during our fishing adventures. The method that enabled me to fish friends and business associates each and every day and share fresh smoked fish too was the following:

I’d fillet my catch at the end of the day and place the best cuts for smoking (the bellies and collars) in my favorite liquid brine and refrigerate until the end of the next fishing day.

It’s then that I would remove the fillets from the brine, rinse well, let them air dry for an hour or two before sprinkling them with spices and placing in my smoker and letting the heating element burn two pans full of wood smoke during the evening hours (before bed).

Given that most of the smoking process, after the smoke from a couple pans of wood is applied, is just drying the fish to the right consistency, I’d just let the smoker run all night, while I slept, and unplug it shortly after the alarm rang the next early AM. It was then that I’d let the fillets cool before placing them in a paper bag with several layers of paper towels in the bottom.

Having fresh smoked fish in the drift boat while chasing fish each day was a big hit with everyone and especially those whose job it was to keep retail stores supplied with smokehouse products.

The home made brine that I mixed then and continue to use includes (remember to stir well):

1/4 cup non-iodized salt (iodized salt is bitter)
1/4 cup soy sauce
1 cup apple juice
1 cup sugar (brown sugar works too)
1 to 1-1/2 quart water (depending on amount of fish)
Immerse fish fillets in the above solution, refrigerate overnight (longer is OK), rinse thoroughly in fresh water, pat dry with paper towels, place on smokehouse racks (skin side down helps prevents sticking), sprinkle with ground garlic, onion and black pepper (or other favorite spices), and add a final sprinkling of sugar and let air dry of an hour or more before placing in you smokehouse.

Smoke until done, depending on quantity and desired texture– 6 to 12 hours usually works depending on outside temperature and the heat generated by your smoker.

Ground Venison and Squash Skillet Stew

Ground Venison and Squash Skillet Stew

When I first found this recipe for Ground Venison and Squash Skillet Stew it did not sound good. But since I had a bumper crop of yellow squash from the garden, lots of bell peppers that year, and a good supply of ground venison in the freezer, I tried it, and love it.

I have been making it for years and have adjusted my recipe Try it, you should like it! Its easy and quick.

I usually start in skillet then remember to put it in a pot for easier stirring.

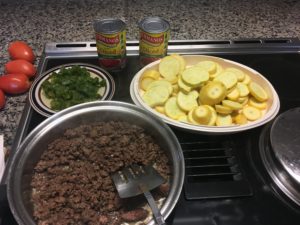
Ingredients

4 or 5 yellow squash
large bell pepper
two 14.5 weight chopped tomatoes with chili peppers
a pound or so ground meat
bacon drippings
Tablespoon salt
half teaspoon black pepper

Ground Venison and Squash Skillet Stew ingredients

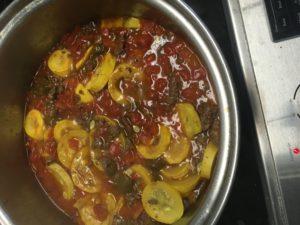
Brown ground meat in bacon drippings. Add sliced squash, chopped bell peppers, cans of tomatoes, salt and pepper.
simmer for 45 minutes.