Category Archives: boats and boating

Getting To Know Your New Boat

Every new boat requires an owner break-in period.
Experiences from this new owner just may help you with yours.
from The Fishing Wire

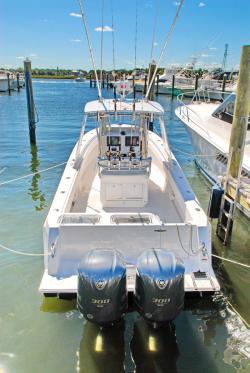
Dan Keating has owned several boats over the years and is an avid fisherman. When he decided to replace his aging center console with a new Yamaha-powered Contender® 32ST, he realized it would take some time to acclimate himself to his new fishing partner. Anyone purchasing a new boat might benefit from his experiences with the dealer and what he did on his own in the weeks after taking delivery.

Taking Delivery of Your New Boat

Taking Delivery of Your New Boat

Taking delivery of a brand new offshore rig is a big day in any boaters life–but an experienced dealer can readily walk you through it.

Dan purchased the boat from Mike Bucskowski, the sales manager at Hoffman’s West, a Contender® dealer in Brielle, N.J. Mike went through the boat’s features and benefits during the sales process so Dan had an appreciation of its finer points before closing the deal. The process of really learning the boat starts at the time of delivery when the salesperson goes over the boat in detail. It’s not just a courtesy; it’s the first step toward safe boating for the new owner.

“Dan is an experienced boater, so I had no concerns about his ability to run the boat,” said Bucskowski. “If he was a newcomer to boating, there would be additional assistance offered as part of the delivery process. We work with a professional captain who would spend time with the buyer teaching the basics of running the boat. They would also spend some time on the water together. It’s more involved than taking delivery of a new car, and we try to match it to the experience level of the purchaser.”

Dan and Mike spent a considerable amount of time together at delivery starting in Mike’s office where they discussed the warranties for the boat and Yamaha F300 engines. Mike explained the manufacturer’s prescribed maintenance schedule and the break-in period for the engines-simple things the owner should do during the first few hours of operation. He encouraged Dan to take the time to familiarize himself with the engine owner’s manual, which contains helpful advice that can ensure the engines will provide years of trouble-free service.

The job of familiarizing the owner with his new boat is very hands-on for the dealer. Dan’s Contender® was accompanied by basic paperwork, lists of the optional equipment and aftermarket products – things like the optional live well pumps, custom outrigger bases and, in Dan’s case, the bow thruster. The paperwork also included a layout sheet detailing the size and locations of the gas tanks (yes, you can even order optional fuel tanks) and the general deck configuration. With all of this covered, it was time to move outside to the boat.

Mike walked Dan through the entire boat from bow to stern, covering everything from the anchor locker to the boat’s electrical system and the location of the batteries, battery switches and breaker panels. At the stern, he spent extra time going through the bait well and bilge pumps, the location of thru-hull fittings, the valve systems for the live wells and saltwater pickups for the washdown system. He reviewed the external fuel filters and suggested maintenance intervals, then moved to the console. Here, they went over the switch panel and the Yamaha Command Link® engine monitoring system, electronic engine controls and the bow thruster. The last thing was a brief introduction to the navigational electronics.
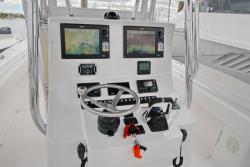
Electronics On Boat

Electronics On Boat

New electronics have an amazing array of capabilities, but the rapid change in technology requires skippers to steadily update their skills.

“Mike did a great job of introducing me to my new boat and making sure I understood the importance of proper break-in,” Keating told us. “Things have definitely changed since I bought my last boat, and there is certainly a lot to learn in the coming weeks.

“Becoming familiar with a new boat is a process that starts with learning the basic systems and then running it to get to know how the boat handles, which I call ‘due diligence’ so you can operate the vessel to its potential with confidence – and in a safe manner.”

Once the boat was berthed in its slip, Dan began a study period.

“I took the engine manuals down to the boat and started reading with everything right there in front of me,” he said. “There’s nothing like being able to look, touch and push the buttons while reviewing the manuals for the instructions to sink in quickly. Programming the Command Link was an interesting project because it is so versatile and offers so many customizable screen menus. I set it up the way I thought I would like it, but after running the boat a few times, I went back and reprogrammed the display a little differently.”

Another challenge was learning to use the new touch-screen sonar, radar and navigational system. The capabilities of modern marine electronics are expanding at the speed of light, and going from the equipment he had to the new system would require time with the manuals, practicing with the units and getting out on the water.

After a walk-through with the dealer and some study on your own, you’ll be ready to take the helm of your new rig.
The final challenge for Keating was getting an understanding of the handling characteristics of the new boat, which has a step hull as opposed to the traditional deep V of his previous boat. At slow speeds there is little difference in handling and during docking maneuvers, but it is critical to understand how any boat responds to the helm. How much power is enough when backing into a slip? How is the boat affected by cross currents at slow speed? How does it respond to steering input at various speeds? In the open ocean, how does it handle in different sea conditions?

“While I had the irresistible urge to take the boat fishing, I left the rods home a few times and took it out just to get better acquainted with how it handled,” Keating said. “It had similarities and differences from my old ride and I had to get in tune with them. For example, the step hull handles rough water better at faster speeds, which is almost counter intuitive. When the sea gets choppier, instead of slowing down, speeding up a thousand RPM improves the ride. Every hull and engine combination requires a period of adjustment to learn what to expect from it.”

Keating has had the Contender® for a bit over two months now and is comfortable with the boat and in his ability to interface with it. He’s still learning something every time he leaves the dock and that will continue for some time to come, but that’s just one of the great things about buying a boat.

Why Do I Need An Emergency Locator Beacon?

Emergency Locator Beacons Save Lives
from The Fishing Wire

Are you equipped for a life-threatening emergency?

Emergency Ditch Kit

Emergency Ditch Kit

An emergency kit or “ditch bag” assures safety in the event you have to abandon ship–it goes with you to assure you’ll be found.

“Emergency Beacon and Flotation Devices Save Two off Miami Beach”* read the headline of a recent press release sent in October by the U.S. Coast Guard. It continued, “A personal locator beacon (PLB), life jacket and an inflatable cushion likely saved the lives of two people who were rescued by a Coast Guard aircrew after their boat sank, stranding them in the Atlantic Ocean…”

The unfortunate situation developed when a 22-foot catamaran in distress sank out from under two people who were boating off Florida’s East Coast. Fortunately, an emergency signal broadcast by the PLB they had with them quickly alerted the Coast Guard command center in Miami of the problem and the exact location of the people in the water, who were kept afloat by the PFDs they were wearing. A Coast Guard Dolphin helicopter was immediately dispatched and, by tracking the emergency beacon, the members of the Coast Guard were on the scene in a matter of minutes to safely rescue the stranded survivors.

Not all emergency situations at sea end with the prompt rescue of the passengers on board. Having personal floatation devices aboard is not only smart, but also required by law. It’s even smarter to wear them, rather than keeping them stowed away until an emergency situation is imminent. However, it’s important to remember that PFDs do not guarantee you will be found once you’re in the water away from the boat. The ocean is vast, and it is very difficult to spot a person floating in the waves from the air or from the water, especially if conditions are rough. That’s why all boaters should have some type of emergency locator beacon or satellite communicator aboard the boat every time they are on the water.

Emergency Position Indicator Radio Beacon

LocatorAn EPIRB in a hard container can provide years of service without maintenance, and can be a real life-saver should your boat ever submerge

In years past, the only type of emergency beacon available for maritime use was an EPIRB. They were large, expensive and required frequent servicing, which put them out of reach of most small boat owners. Their use was mandated for vessels carrying people for hire, but not for private recreational vessels. However, in recent years technology has brought the price of a hydrostatically deployed EPIRB under $600, which means putting one on larger recreational boats is pretty much a given. These new generation models can be placed on a center console’s T-top or a cruisers hard top, where they are out of the way and the battery packs do not require replacement or servicing for up to five years. They are housed in a hard shell container that releases them when a vessel is submerged, reaching a depth of three to 10 feet. The EPIRB is activated automatically when it is released from its container and transmits an emergency signal on 406 MHz, which is monitored by the Coast Guard in domestic waters and other emergency responders outside the U.S. Should a boater need assistance outside of radio range while the boat is still afloat, the EPIRB it can be activated manually.

Personal Locator Beacon

Personal Loctor

Personal Loctor

The personal locator beacon assures you’ll be found if you have to go into the water offshore.

For owners of smaller boats and for individual use, there is a newer emergency locator option similar one used by the boaters mentioned in the Coast Guard press story. It’s called a Personal Locator Beacon (PLB), a device about the size of a small hand-held VHF radio that can be carried on your person or kept in a convenient spot aboard the boat should trouble arise. The PLB has to be activated manually and broadcasts an emergency signal on 406 MHz like an EPIRB. It also sends a second homing signal on 121.5 MHz. Many models also incorporate an internal GPS unit that broadcasts the unit’s position with accuracy within 100 feet. This greatly enhances the chances you will be found quickly by the Coast Guard or other responders. Most PLBs have batteries with a life span of five-to-six years so they require little or no maintenance. They can be used both on and off the water, so they are also useful if you’re hiking, skiing or camping in remote areas. They have a battery check feature and a self-test mode to ensure they are operational. There are PLB devices available through your local marine supply store or online that retail for as little as $250.

Satellite Tracker/Communicator

Locator/Communicator

Locator/Communicator

Satellite Tracker/Communicators like the SPOT provide tracking and texting abilities to assure you get home safe–and they’re very affordable.

The latest in emergency locator technology is the satellite tracker/communicator. Like PLBs, this device can be used on a boat or on land in remote locations. It can serve several functions depending on the model purchased, and much like a cell phone, a subscription plan accompanies the unit with a service charge that can range from $10 to $50 per month, depending on the level of service required. The basic units can be set up to track your location at pre-selected intervals, and that information is available to people on a list you give to the service provider. These satellite units also have a 911 or SOS feature that can be activated should you encounter an emergency situation. When activated, this feature transmits the unit’s location to the GEOS 24/7 search and rescue monitoring center, which then contacts the appropriate search and rescue organization and directs them to your location. In the case of a boater, that would be the Coast Guard.

These units are very compact, battery-operated, and most are rechargeable. They are also affordable, with the basic units carrying a suggested retail price of under $150. There are more expensive units that have greater capabilities like satellite text messaging and even phone service.

It’s up to you to determine the type of emergency beacon that fits your boating needs, but one thing remains certain-having an emergency beacon aboard your boat, in your ditch bag or on your person can increase the odds of surviving an emergency at sea or on any large body of water. Safe boating is everyone’s responsibility.

Getting Your Fishing Equipment Ready For Winter

Is your fishing equipment ready for winter weather?

A sign at my lawnmower shop reads “Man who leaves lawnmower outside all winter will not mow grass in the spring.” That not so subtle hint should be a warning to fishermen, too. If you don’t prepare your equipment for winter storage, you won’t be a happy fisherman when the weather gets right for that first trip next spring.

Make a checklist so you are sure you take care of all the important things you need to do. These will cover most of them but you should add any others that work for you.

Where you store your boat for the winter is important. If you can store it inside you will be far ahead of game. If not there are many more things you must attend to for the coming harsh weather.

Your motor is the most likely problem after sitting up all winter. Gas deteriorates with time and can foul your engine. The newer blends of gas with Ethanol in them are bad for outboard motors, too. If possible, buy gas with no Ethanol added the last two times you fill up each season so no alcohol is left in the system. It is best to store your boat with a full tank of gas, too.

Lower your motor till it is straight up and down and store in that position so water runs out and does not collect in it. Add a gas stabilizer like Sea Foam to your last two tanks of gas so it works through the motor as you run your boat. It will clean your motor and you are ready to store after the last use.

You can also disconnect your gas line and let the motor run until all the gas in the system is burned up, but this also removes the oil. Once the motor is running stabilized gas, or after it stops if you run it dry, spray an engine fogging oil into the air intake until the motor stops running. If it is already stopped keep turning the motor over until you see the fog coming from the exhaust port.

Remove spark plugs and spray more fogging oil into the cylinders. Turn the flywheel to spread the oil inside. Have a new set of spark plugs ready for the spring, but it is best to wait to install them until you can run your motor one time to burn off the fogging oil. New plugs installed now will be fouled by that first trip.

Drain your lower unit oil and refill with new oil. If you see water in the oil or if there are metal filings in it, you will need to have it checked for new seals or repair work. Put in a new water pump. Water pumps in outboard motors wear quickly and it is a good idea to replace them often.

Spray all linkages and connectors in your motor with a good oil spray like WD-40. Disconnect manual steering cables and make sure no water is in them, and force grease into them if they don’t have a grease fitting. Grease all fittings for steering and motor mount bearings. Put a light coating of grease on the starter bendix and shaft.

Park your boat and raise the front. Pull the drain plug and leave it out. This lets all water drain from it and will keep water from collecting in it during the winter. Disconnect your batteries, make sure they are filled with water, clean the terminals and connectors and put a light coating of grease on them, and charge the batteries. Keep a trickle charge on them or check often to keep fully charged all winter long.

Take all equipment out of the boat and disconnect and store all electronics inside after cleaning them. Spray all connectors with an oil spray. Clean and store life jackets where vermin won’t chew on them. Check and store expendable equipment like fire extinguishers and flares, making sure they are still good. Put fishing equipment aside for later work.

Take off your prop and grease the prop shaft. Check for damage to the prop and get it serviced if necessary. Be sure to use the correct kind of cotter pin to hold your prop nut on if it requires one. Replace prop and tighten to specifications for your motor.

Check trolling motor bolts and fittings and tighten. Remove the prop and make sure no line is under it, and the seal is still good. Grease all moving parts of the mounting system and the cable.

Wash and wax your boat and trailer, including the motor cover. This removes dirt and stains that may set over the winter and be almost impossible to remove later, and the wax protects the finish.

If you have power steering on your boat, check the fluid level. Check the fluid level in your power trim. Disconnect the speedometer tube and blow the water out of it. Check all cleats and other fittings and tighten all bolts and screws, especially on seats. Spray all seats and other similar surfaces with a good vinyl spray to protect them.

When the boat is clean and dry, put a cover on it if it stays outside. Make sure the cover keeps rain, snow and ice out of the boat but has some air circulation so moisture won’t build up inside from condensation. Secure and support the cover so it won’t blow off and ice and snow won’t collapse it.

Jack up your trailer and block it so the tires are off the ground, and leave it that way. Pump up tires to recommended inflation, and if you can store tires inside, do so. Repack wheel bearings and check surge brakes for wear. Check tires for uneven wear and get them balanced or aligned as needed. Cover your tires to protect them from the sun if they are outside. Grease your tongue jack and hitch connector, and spray oil spray into both male and female light connectors.

Make sure all lights are working and sealed, with no water inside. If you see water inside, take the cover off, dry them out and spray with a oil spray. Replace bad bulbs and cracked lenses, and secure all wires to the trailer that may have worked loose.

This is a good time to sort all your tackle, making a list of what you need to replace. Sharpen hooks, replace rusty hooks, repair any damaged plugs and replace stiff spinnerbait skirts. Store plastic worms in bags that will not deteriorate. Clean tackle boxes and refill with your favorite baits.

Rods should be wiped down with a oil spray and the reel seat cleaned and oiled. Check all guides for rough spots. Visually inspect them but a cotton Q-Tip or piece of woman’s hose run through them will show tiny cracks that can cut your line.

Reels should be taken apart, cleaned and oiled, reassembled and stored. This is a good time to send a reel off to a good repair shop. Many will clean your reels for a small fee and replace damaged or worn parts for an additional fee.

Remove all monofilament type lines. They don’t hold up well during the winter, so wait until spring to fill your spools with new line. Put a small sticker on your reel to remind you of the type and test line if you need to. Check braided lines for wear and replace as needed.

Some of us are fortunate and can fish all winter, using our boat and tackle often enough to keep it in good working order. But even for those fishing year round, an annual “winter cleaning” will keep everything in top condition. Do it on those days you really don’t want to be on the water even if you can, so you will be ready for the good days when they come.

Two products will make winterizing your boat easier and take care of many problems. An oil spray like WD-40 will clean surfaces, protect against rust and dry moisture when sprayed into couplings, moving parts and sockets. A light coating will protect all winter long and not cause problems in the spring.

Adding a gas stabilizer and engine cleaner like Sea Foam to your fuel on a regular basis will help keep your engine running smooth and keep gas from gumming up your engine over the winter. Most important, it helps control the build up of moisture in your fuel tank and motor, a major problem since most brands of gas now contain Ethanol. Sea Foam is available gallon cans to keep cost down.

Using Charts and Markers To Find Your Way On the Water

How to Make Sense of Charts and Markers on the Fly
from The Fishing Wire

Even small children know what street signs mean. Stop, one-way and the like come easily. But boating traffic aids are different. First of all, the words “map” and “sign” aren’t even part of the lingo when it comes to nautical navigation. Rather, “charts” and “markers” serve as your guides, and it takes some savvy to know how to interpret them without pause.

A compass helps find your way

A compass helps find your way

A compass can be used to locate markers or structures on shore, helping to assure you of your position even without GPS

As long as you are within sight of land and have a chart, you have everything you need to understand your location. In addition to the buoys and such (called navaids in nautical parlance), charts also show significant shoreside structures. All you need to do is look across the top of your compass and read what the bearing (direction to) is to the structure you see on shore. Find the structure on your chart, and draw a line from it on your chart that reflects the bearing you saw. That line represents one leg of your position. Do this with several bits of structure and then plot those bearings on the chart as well, using the compass rose, parallel rules and a pencil. Where all the lines intersect is the point at which you are located. Then look at your depth sounder to see that the water depth matches the depth under the spot where the lines intersect.

You can also use your depth sounder as a navigation tool. Pick a depth contour in the distance offshore that you want to transit (for example 50 feet). If the number goes up, steer toward shore. If it goes down, steer toward the deep. With this simplistic navigation process, even a novice can stay on course. You can readily navigate according to depth contours by simply selecting a depth that more-or-less parallels your course while avoiding obstructions.

So what about using navigation markers? On the Intracoastal Waterways, generally red marks are on the mainland side of the channel. And of course, coming in from sea, it’s always Red/Right/Returning(in the U.S.). Perhaps the easiest way to remember what a mark means is to keep a navaid sticker next to your helm. These helpful stickers can be purchased inexpensively through most marine supply stores. They also give you all the right-
of-way whistle signals.

Watch for channel markers

Watch for channel markers

Channel markers help boaters stay out of trouble–but only if you know what they mean.

Don’t be afraid to alter your course and go right up to a marker to see what it is (at slow speed, of course). The absolute best proof of your exact position is to be right next to a marker with a number or letter. Make sure to always check that marker’s position against your chart as well.

Many may think that paper charts are not necessary due to the availability of electronic chart plotters with built-in GPS. But remember two crucial things:

If a device runs on electricity, it can suddenly stop working for numerous reasons no matter how inconvenient the situation. Electronic cartography still has not been deemed a legal means of navigation. If you ever get in an accident due to a navigational error and don’t have that “legal piece of paper” called a government-issued nautical chart, you could find yourself in a difficult situation

Many new boats don’t come equipped with navigation equipment. If you sea-trial a boat in areas where you have no local knowledge, it’s always a good idea to take along a handheld GPS. Alternatively, if you have a smartphone, make sure to download the award-winning Navionics + app. For fishing, try Navionics+ SonarCharts that provide incredible bathymetric charts within the normal chart plotter functions.

Have a nice day

Have a nice day

With a careful eye and a basic understanding of navigation, you’re ready for a pleasant day on the water.

Many states now require boaters to have a certificate proving that you have taken and passed a basic seamanship course. There are numerous such courses to be found online, some at a fee but many are offered free of charge. Boat-ed.com lists all the states that require boating safety certificates and provides links to each.

Finding boating safety courses in your chosen search engine will bring up pages worth of course opportunities. BoatUS® also offers an outstanding free course that can be tailored to various states where you might be boating.

Remember one other important fact: You may live in Virginia and have a certificate from there, but if you travel to Maryland, Delaware or North Carolina, you may need to get certificates from those places as well. Not all contiguous states enjoy boating safety course certification reciprocity. Check first to avoid potential fines.

Why Am I A Loyal Yamaha Outboard Motor Owner?

My Yamaha Outboard

My Yamaha Outboard

Yamaha Outboard Motors Got A Customer For Life!

In 2004 I bought a Skeeter 225 bass boat with a Yamaha 225 HPDI outboard motor. The boat was a “demo” boat owned by a salesman at a dealer in Atlanta and I got an excellent deal on it. The outfit was six months old when I got it, looked brand new and came with a full warranty on the boat and motor.

I really liked the Yamaha outboard. I had seven OMC motors and all gave me good service, but the HPDI got much better gas and oil usage, and it cranked very easily, even in cold weather. The motor ran good and I had no problems with it other than changing water filters often. I really liked the Skeeter boat, too, but had some serious problems with it, but that is another tale for later.

In 2010 I was at Sinclair working on a GON article and the motor made a strange noise and died just as we stopped on the last spot for the day, right at dark. It would not crank so we fished for a while, then the motor cranked right up. We ran in and I started and stopped and ran around some while waiting on the trailer. The motor never missed a beat and ran good.

I took the boat to Oconee Marine, a Yamaha dealer not too far from me, and they checked it out. They put it on the computer and could find nothing wrong with it.

A few days later in a club tournament at West Point the motor made a terrible sound and stopped. When I tried to crank it the sound was like shaking a sack of metal pieces. I fished back to the ramp and go the boat loaded and took it back to Oconee Marine the next day.

Two days later I got a call with bad news. The motor had come apart and I needed a new $8000 power head. The motor was over six years old at this point and a new one was very expensive so I told them to put one on. After all, I had a new lower unit from hitting a rock pile in Wisconsin, another tale for later, so I basically would have a new motor from top to bottom.

The next day I got a call from Oconee Marine with incredible news. They had contacted Yamaha and told them about checking the motor and finding no reason it should have blown. Yamaha comped me a new power head and the labor to install it! That was on a six year old motor, out of warranty and well used.

Yamaha really stands behind their motors. I have heard they have done the same for other Yamaha motor owners. I think the problem was the change to E10 gas with Ethanol in it, something the motor was not designed for. Now I am really worried with the coming planned change to E15 with even more alcohol. If I understand it right, no outboards and few cars are under warranty using that mix.

I have run the motor with the new power head for three more years not and it has not had a single problem.

If I buy another outboard motor it will definitely be a Yamaha!

Fishing A West Point Tournament and Blowing Up My Motor

Bass like these helped me place third

Bass like these helped me place third

The Flint River Bass Club held its September tournament at West Point on a Sunday a few years ago. After fishing from 7:00 AM to 3:00 PM the nine members of the club brought in 24 keeper bass weighing about 34 pounds. There were two limits and one person didn’t have a keeper. There were 14 spotted bass and ten largemouth brought to the scales.

Bobby Ferris won with a five fish limit weighing 9.16 pounds. He also had big fish with a 2.91 pound largemouth. Lee Hancock came in second with the other limit weighing 7.46 pounds. My four weighing 5.90 pounds was third and Kwong Yu had three weighing 4.06 pounds for fourth.

My day started out pretty good. I left the Glass Bridge ramp and wanted to stop on a nearby shoal but there was a boat sitting there, so I ran on up to the Highway 109 Bridge. On my second cast to the riprap I hooked and landed a two pound largemouth. Putting one in the live well that quickly made me feel good.

After about an hour fishing around the bridge and catching a few short spotted bass I cranked up and ran to a point about half way to the railroad bridge. As I came off plane my 225 Yamaha made a strange rattling noise and shut off. When I tried to crank it there was a bad noise.

There I was, several miles from the ramp with about seven hours left to fish. I decided to fish my way back, working banks and points on the way. Since I was fishing by myself I didn’t mess up anybody else’s day.

I caught a few small spots then, near the highway bridge I got a keeper spot in the back of a pocket on a jig head worm. I would not have fished there if my motor had not died. At the bridge I caught a third keeper, another small spot, off a bridge piling on a small jig and pig.

By now it was noon and I had a long way to go, so I put the trolling motor on high and headed across the shallow flats in front of Pyne park. As I cruised along a school of fish came up and I grabbed my topwater popper and landed a two pound spotted bass. Another place I would not have been if my motor was running.

After catching a few more short spotted bass I got back to the ramp before the deadline.

What Are Coast Guard Safety Inspections?

Boats like these may check your boat.

Boats like these may check your boat.

Coast Guard Safety Inspections
from The Fishing Wire

Is your boat equipped and ready to pass one? It should be.

Coast Guard safety inspections can be performed any time you’re boating in an area supervised by the Coast Guard–have your boat ready for them.

It was a hot Saturday afternoon in July, and the river was busy with boats returning from the ocean waiting to pass through a narrow railroad bridge a quarter mile from the inlet. There were recreational boats of all sizes-large sportfish and cruiser types, personal watercraft and outboards of very description. While waiting to make the passage, a familiar orange vessel appeared off our starboard side with its blue revolving light shining brightly. It was a Coast Guard RIB, short for rigid inflatable boat, and a guardsman was standing on the bow motioning to our boat.

“Good afternoon, Captain,” he said. “We would like to conduct a safety inspection of your vessel. May we board, please?”

Coast Guard inspections of this type are mandatory so the question was a courtesy. A boater can either be pleasant or confrontational, but there is never a good reason for not complying. This is especially true when you think about the difficult job these hard-working men and women undertake, and that they put their lives on the line when called on to make hazardous rescues at sea.

So my appropriate response was a pleasant greeting and a simple welcome aboard. The coxswain, the guardsman at the helm of the RIB, brought the boat alongside and two others, wearing dark blue uniforms and bright orange PFDs, stepped aboard. The boarding officer announced his intention: to identify the vessel, the owner and the operator, check the paperwork and conduct an inspection to be sure it had all the safety equipment required by Federal Regulation for that classification of recreational vessel.

“You may continue through the bridge,” the officer said, “and proceed to your destination while we conduct the inspection so we don’t slow your progress.”

A “ditch bag” you’ll take with you if you ever have to abandon ship is always a good idea. Including an EPIRB, VHF and handheld GPS is a good idea if you boat on large bodies of water.

He told us that the crew in the RIB would follow along and pick them up when the inspection was finished. He then asked for our vessel registration, which is mandatory, and the operator’s driver’s license, social security number and date of birth, which is voluntary. Since we were in a state that requires a vessel operator to have a safe boating course certification, that certificate was also provided with the other documents. The documents were passed from the boarding officer to the other guardsman, who entered the data into a hand-held electronic touch-pad device with a built-in printer.

The next step was a check of the mandatory safety equipment on board. Since we were wearing inflatable PFDs at the time, they were checked to assure both were Coast Guard-approved and properly armed. An approved PFD is required for every person on board a recreational vessel, so we keep a valise stowed in the console with four additional Type III units. A throwable floatation device is also required, which can consist of an approved life ring or a flotation cushion. That was also checked to be sure it was in good condition.

During the inspection, an interesting discussion with the boarding officer ensued about the whole procedure. He explained that it was the Coast Guard’s policy to do safety inspections as a method of outreach to the boating public to impress upon them the importance of carrying the necessary safety equipment in case of an emergency.

Next, he asked to see and test our audible signaling device, a horn, which can be an electric horn mounted on the vessel or a hand-held device powered by a compressed air canister. Then he requested we show him the boat’s emergency flares to make sure we had them aboard and that they were not expired. All flares have expiration dates stamped on them and should be properly disposed of and replaced when that date is exceeded. The flares are kept in a “ditch bag” stowed in the console and when we took it out, the boarding officer was duly impressed. He asked if he could look inside and was surprised to see a PLB (personal locator beacon), a waterproof hand-held VHF radio, additional signaling devices and flares.

Inflatable PFD’s are cool and comfortable, but be sure the CO2 cartridge is fully-charged and functional.

When the inspection was complete, the boarding officer gave the vessel a once over, complimented us on the fact that our safety equipment went above and beyond regulations, noted the vessel was well maintained and organized, and thanked us for our cooperation. The guardsman recording the results of the inspection asked our captain to sign the touch-pad on his device, and it printed out a boarding report indicating that the vessel had no violations or warnings. If the inspection had uncovered any flagrant violations, a summons that can include civil penalties would have been issued. If the violations were minor in the judgment of the boarding officer, a warning can be issued and a follow-up inspection could be required to make sure it was satisfied. It’s important to keep any completed boarding reports aboard your vessel. These reports can be shown to Coast Guard officials in the future and can help you avoid a repeat inspection within a specified time period.

The entire experience lasted about 15 minutes, and at all times the boarding officer was courteous, friendly, knowledgeable and professional, willing to answer any questions and provide additional information on the procedure and the equipment requirements.

The question is, “Are you ready to pass a Coast Guard Safety Inspection?” If you would like to find out more about recreational vessel safety regulations, go to the Coast Guard Boating Safety Resource Center at
www.uscgboating.org.

You can even find a local provider that will conduct a comprehensive safety survey of your vessel to make sure it is in top operating condition and equipped with all the necessary equipment.